Grow garlic in containers: a fall-to-summer plan
One wide, well-drained planter can turn a few locally suited cloves into a useful first crop. The work is simple, but the calendar is long: measure now, protect the root zone through winter, and keep the spring routine steady.
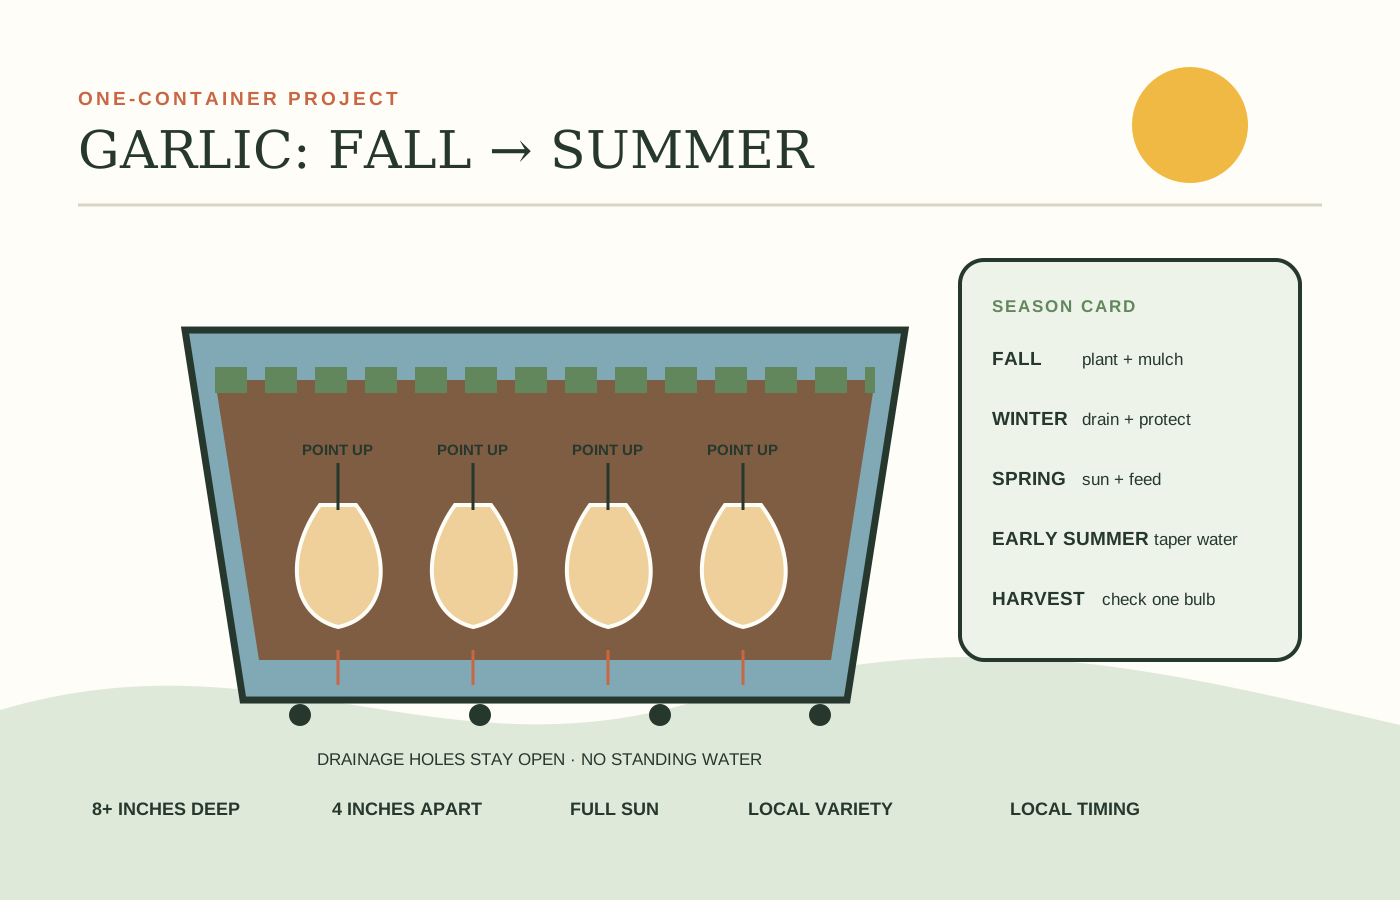
Container garlic suits renters, balcony growers and anyone whose in-ground soil is rocky, compacted or unavailable. It also exposes every weak choice. A small pot changes temperature quickly. A blocked drain can leave cloves sitting in cold water. Crowded plants compete for the same limited moisture and nutrients. An indoor windowsill can provide warmth without the outdoor seasonal pattern a locally adapted garlic variety expects.
Current October search questions and public gardening discussions cluster around five practical uncertainties: how deep the pot should be, how many cloves fit, whether drainage holes are essential, whether the planter needs winter insulation and whether it can move with a renter in spring. Those questions belong in one plan because changing container size changes weight, winter exposure, water behavior and the number of plants.
Garlic timing and winter care vary by climate. The planting windows in this guide are examples from Extension sources, not a universal calendar. Ask your county or regional Extension service which hardneck or softneck cultivars suit the area, when to plant, and how an outdoor container should be protected where you live.
Start with the harvest you want
Full bulbs are a long project. Fall-planted cloves form roots before or during winter, grow leaves in spring, form bulbs as the season advances and are harvested in summer. Utah State University Extension notes that roots develop through fall and winter even when little top growth is visible. A pot that looks quiet may still be working.
If the goal is a mature bulb, give each clove room and keep the plant through the entire cycle. If the goal is tender green garlic, the planting can be denser and the crop comes out earlier, before bulbs mature. Do not use green-garlic spacing and then expect large storage bulbs.
Hardneck and softneck garlic have different habits. Hardneck types form a firm central stalk and often produce scapes; many are adapted to colder regions. Softneck types lack the same stiff central stem, can be braided and generally store longer. Local adaptation matters more than a national “best” list. Buy named planting stock from a reputable local nursery, seed supplier or grower who can identify the type and cultivar.
Measure the container before buying cloves
Oregon State University Extension says garlic can grow in a container at least 8 inches deep and calls for drainage holes near the bottom. That is a useful minimum, not proof that every 8-inch pot will perform alike. A wider container holds more plants and usually gives the root zone more stable moisture. A larger soil mass may also change temperature more slowly than a tiny pot, although it remains more exposed than in-ground soil.
Measure internal width, length and usable soil depth. Then sketch a grid with cloves about 4 inches apart, using OSU’s container guidance as a starting point. Keep the same space between a clove and the pot wall so the outside plants do not lose half their root area. Penn State guidance for field production uses 4 to 6 inches between cloves; wider spacing generally gives bulbs more resources but reduces the number that fit.
Choose a container that can survive the winter
Check the maker’s outdoor and freeze-thaw guidance. Penn State Extension advises storing pottery or terra-cotta containers to prevent freeze damage and notes that plastic or metal winter containers need generous drainage. A planting container must hold wet mix, roots, mulch, rain and possibly snow without splitting, bowing or becoming unstable.
If the container may need to move, solve that before filling it. Measure the doorway, elevator, stair, balcony threshold and final spring location. Put the empty container on a load-rated plant caddy only if the caddy and surface can support the finished load and remain stable in wind. A large wet planter can be far heavier than expected; do not promise yourself that it will be easy to lift later.
Use container mix, not dense yard soil
Penn State’s container guidance recommends a soilless potting mix rather than straight garden soil, which can become dense and drain poorly in a pot. Use a fresh, clean mix intended for outdoor edible containers. If reusing mix, first follow the health-based sorting steps in the fall potting-soil guide; do not reuse material from diseased alliums or a container with unresolved drainage problems.
Garlic prefers well-drained soil and consistent fertility. A laboratory soil or media test and local Extension recommendation are better than a generic handful of fertilizer. Record the product, analysis, amount and date. More fertilizer does not correct poor drainage or crowded roots.
Choose healthy, locally suitable planting stock
Use sound, firm cloves from bulbs sold for planting. Extension sources caution that grocery-store garlic may have been treated to inhibit sprouting and may not suit the local climate. It can grow, but its low price does not make it the most reliable learning material.
Keep bulbs intact until close to planting. Penn State recommends breaking bulbs apart no more than a day before planting so the root nodules do not dry. Select large, healthy outer cloves for the container and cook with the small or damaged cloves. Keep the papery wrapper on each planting clove as much as practical.
Reject cloves with mold, soft spots, wounds, missing basal plates or an uncertain disease history. Garlic reproduces vegetatively, so a problem can travel with the clove. Do not treat “organic grocery garlic” as a plant-health certification.
Plant for roots, not an instant green display
Local calendars differ. Minnesota Extension times fall planting roughly one or two weeks after the first killing frost. Oregon Extension gives September through mid-November for several Oregon regions. Utah State describes late September through November. These examples show why a fixed national date is weak: use your local frost pattern and Extension guidance.
- Prepare the site. Put the empty container in its planned outdoor location. Confirm the surface can carry the wet load and that water drains without creating a slip, stain or neighbor problem.
- Open the drains. Make sure every intended drainage hole is unobstructed. Do not build a sealed gravel reservoir under the mix or leave a saucer full of water.
- Fill with moistened mix. Leave room for planting depth, mulch and watering without washing soil over the rim. Settle gently rather than compacting the mix hard.
- Mark the grid. Lay out cloves around 4 inches apart, including the wall margin. Reduce the clove count if the last row would be crowded.
- Set each clove upright. The flat basal plate goes down and the pointed tip goes up. Penn State sources describe planting about 1 to 2 inches deep; OSU sources commonly use about 2 inches. Follow local guidance for your climate and mulch system.
- Water the planting. Moisten the root zone and confirm excess water exits. Do not keep adding water just because the surface looks dry the next day.
- Label the project. Record cultivar, hardneck or softneck, source, planting date, clove count, spacing, depth, mix, amendments and a photo.
Green tips before winter are not automatically a failure. Penn State notes that garlic can emerge before truly cold weather and often escapes damage unless temperatures become extreme. Do not dig up a clove to make it “start over.” Observe and protect the root zone according to local guidance.
Protect a container without trapping water
In-ground soil cools gradually. A pot is exposed on the top and sides, so its root zone can freeze faster and cycle more sharply. The practical response depends on climate, cultivar, container material and location. Ask local Extension whether to group containers, place them against a sheltered unheated wall, insulate the outside, sink the pot into soil, or use another local method.
Mulch is part of many fall garlic recommendations. Penn State describes 2 to 4 inches of straw for commercial plantings and 4 inches of straw or shredded leaves for home garlic. Mulch can moderate temperature, discourage weeds and reduce frost heaving. In a container, keep the layer loose, do not pack it against emerging leaves, and make sure it cannot block the drain or blow into a walkway.
Drainage remains the central winter check. Raise a pot only with a stable support that keeps holes open and does not create a tipping hazard. Remove water-catching saucers. Inspect after heavy rain, snowmelt and freeze-thaw weather. A pot can look dry on top while the bottom remains saturated or frozen.
Water needs fall as growth slows, but roots should not be abandoned in a completely dry mix. Check moisture below the surface during dry, unfrozen weather and use local guidance. Never water a frozen container simply to follow a calendar. Record conditions and decisions so the next season begins with evidence instead of memory.
Do not move fall garlic into a warm living room
A heated room changes light, temperature, humidity and seasonal cues. If winter protection is needed, a locally recommended outdoor or unheated strategy is usually a different intervention from growing the crop as a houseplant. The indoor herb transition applies to tender herbs, not to an overwintering garlic crop.
Reset care when spring growth begins
As hard freezes pass, follow local advice on pulling mulch back so soil can warm. Put the container in full sun if its protected winter position was shadier. Check that roots or settled mix have not blocked the drains. Top up around exposed cloves with appropriate mix instead of pressing them deeper.
Garlic needs consistent spring moisture without waterlogging. Check the mix with a finger or moisture assessment appropriate to the container, then water thoroughly enough to wet the root zone and let excess drain. Wind, pot material, plant size and sun can change the interval. A fixed “every three days” rule ignores the container in front of you.
Follow a soil-test or local Extension fertility plan. Garlic has meaningful nitrogen demand during active leaf growth, but late or excessive nitrogen can work against bulb maturation. Write down applications. If leaf tips yellow, investigate moisture, nutrition, cold injury, root problems and normal aging instead of treating one symptom with more fertilizer.
Manage scapes by garlic type
Hardneck garlic commonly makes a curling flower stalk called a scape. Local guidance often recommends removing it so the plant directs more energy to the bulb; the tender scape is edible. Softneck garlic usually does not make the same prominent scape. Confirm the variety before assuming a missing or present stalk signals a problem.
Harvest by the plant, not a fixed date
Garlic is often ready when lower leaves have browned while several upper leaves remain green. Timing varies by region, variety and season. Check one plant rather than waiting for every leaf to die. OSU advises examining a test bulb for plump cloves and dry, papery outer skin; bulbs left too long can split and lose storage quality.
Stop or taper irrigation according to local guidance as harvest approaches. Lift the bulb rather than yanking the leaves. A hand fork or trowel can help, but keep it far enough away to avoid piercing the bulb. Brush off loose soil and do not wash unless reliable local instructions for the intended use say otherwise.
Cure garlic in a dry, shaded, well-ventilated place protected from rain and direct sun. Keep labels attached. After curing, trim and store according to the variety and Extension guidance. Save only healthy, well-formed bulbs for next year’s planting; do not carry rot or unexplained damage into the next cycle.
Record planted cloves, emerged plants, winter losses, bulb count, bulb diameter, disease or drainage notes, total harvest weight and which decisions you would change. A modest first crop with a good record teaches more than an oversized project you cannot diagnose.
A seven-minute weekly check
- Confirm the container is stable and the drains are open.
- Check moisture below the surface when the mix is not frozen.
- Look for heaving, exposed cloves, standing water, animal disturbance and damaged mulch.
- During active growth, inspect leaves for pattern changes, pests and mechanical damage.
- Photograph from the same angle and add a one-line weather note.
- Resolve problems with local Extension and cultivar-specific guidance before applying a treatment.
Frequently asked questions
How deep should a container be for garlic?
Oregon State University Extension says garlic can grow in a container at least 8 inches deep. More soil volume can buffer moisture and temperature, but drainage, spacing, local winter conditions and container material also matter.
Can grocery-store garlic be planted?
It may sprout, but Extension sources recommend clean planting stock from a reputable local source because grocery garlic may be treated against sprouting or poorly suited to the local climate.
Should container garlic stay outside in winter?
Fall-planted garlic normally develops roots outdoors before winter, but a container is more exposed than garden soil. Ask local Extension about cultivar, timing and protection, and keep drainage open so the container does not remain waterlogged.
Sources
Reviewed October 14, 2026. Local Extension recommendations should set cultivar, timing, fertility and winter protection.
- Oregon State University Extension — Garlic (Fall)
- Oregon State University Extension — Fall Is the Best Time to Plant Garlic in Oregon
- Penn State Extension — Growing Garlic: Fall Planting
- Penn State Extension — Garlic Production
- Penn State Extension — Container Vegetable Gardening: Four Keys to Success
- University of Minnesota Extension — Growing Garlic in Home Gardens
- Utah State University Extension — How to Grow Garlic in Your Garden